IPTV RESELLER PANEL - FULL TUTORIAL
Full tutorial of our IPTV Reseller panel
Below is a full step by step guide for our IPTV reseller panel. Anything you need to know about using it from A to Z is explained and demonstrated here. If you ever need any clarification, contact us via live chat.
IPTV reseller panel offers are good things to make money from; the more serious you are, the bigger the reward. If you are a starter and just decided to become an IPTV reseller, you might find it a bit hard working with a management panel although it is pretty much straight forward. Here I’m going to give the a full walkthrough on how to work with an IPTV reseller panel.
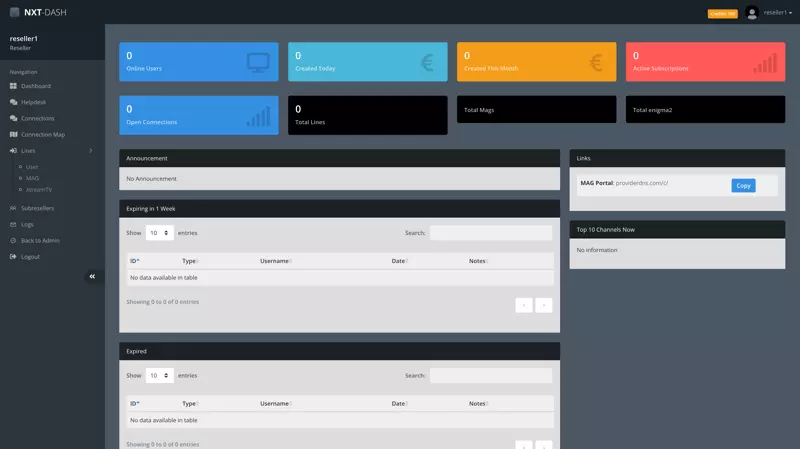
The reseller dashboard, just like most dashboards, consist of 3 main areas:
-Top Information and Monitoring Section
-Middle Information Section of the reseller panel
-Left Access Column
-Top Information and Monitoring Section

On top right you can see the amount of available Credits and next to that, your profile settings and Logout button.
Online Users: Is the total number of online accounts (Streaming Lines, MAG and XtreamTV).
Open Connections: You may have accounts with multiple concurrent connections allowed and here you will see the total number of them in use and online.
Created Today: Shows total number of accounts creation (Streaming Lines, MAG and XtreamTV) in past 24 hrs.
Created This Month: Shows total number of accounts creation in the IPTV reseller panel (Streaming Lines, MAG and XtreamTV) in past 30 days.
Active Subscriptions: Shows the total number of non-expired accounts (Streaming Lines, MAG and XtreamTV).
Total Lines: Shows the total number of existing Streaming Lines in your panel (Active, Expired, Suspended)
Total MAGs: Shows the total number of existing Stalker MACs in your panel (Active, Expired, Suspended)
Total Enigma2: Shows the total number of existing Stalker MACs in your panel (Active, Expired, Suspended)
-Middle Information Section of the reseller panel
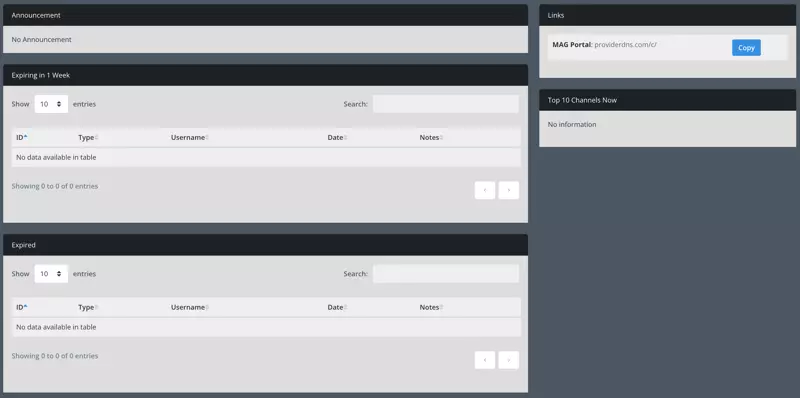
Announcement: Administrator may post announcements here.
Expiring in 1 Week: Lists the accounts which may expire in a week. Its a good thing to be in touch with your clients asking whether they want to renew in advance to their expiration date.
Expired: All expired accounts (Streaming Lines, MAG and XtreamTV)
Links: Is a section where admin may post useful links for you like Stalker Portal address or their Telegram channel link and as such.
Top 10 Channels Now: Here you will know which 10 channels are being mostly watch by your clients. Data is fresh and most viewed channel is listed on top.
-Left Access Column
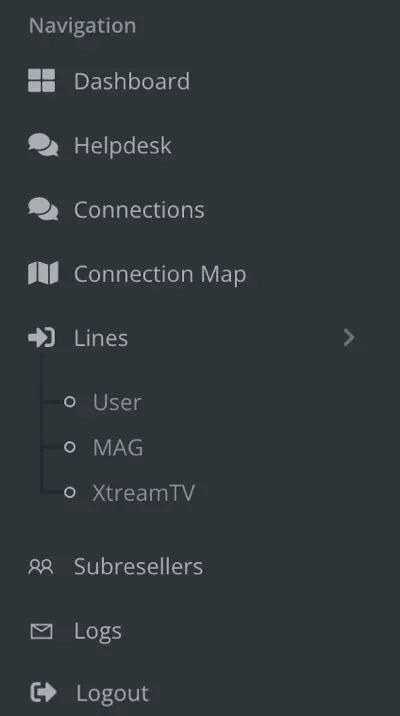
Dashboard:
is where we are right now, the main page you see after logging into the panel.
Helpdesk:
Is where you can open support tickets and message your Admin but I highly recommend using your provider’s suggested means of communication e.g Mail, Client Portal
Connections:
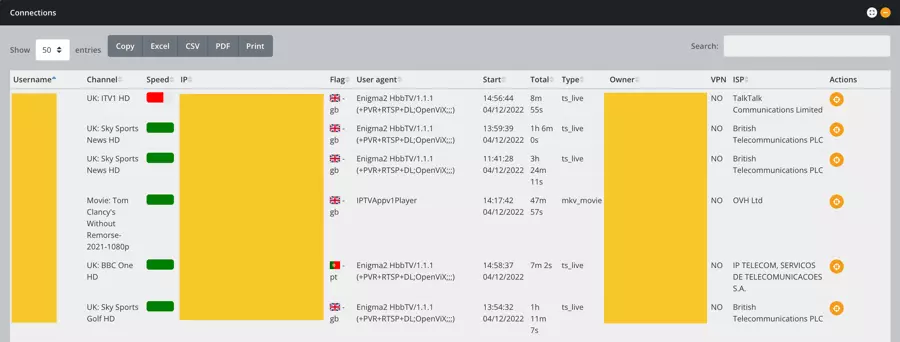
Connections page is where you get a good live insight on your connected clients. From top, you can see there are buttons letting you export and download the data in excel, CSV or even PDF sheets if you want to analyze it for whatever reason. On the top right, you can search for anything specific, like you search a channel name, a username or an ISP name to narrow down the list. Let’s check each column as there are some important details among them although it might look straight forward.
Username: Is the username of the account. It sometimes could be a MAC address belonging to a stalker portal or XtreamTV account.
Channel: Is what your client is watching.
Speed: Is the speed of connection between your client and IPTV server. It is not 100% accurate and it is measured over a few seconds, sometimes a minute, of performance. Red is slow, Yellow means moderate and Green full bar which means the connection between the client and the server is healthy and fine resulting in perfect streaming.
IP: would be the Internet IP Address of your clients.
Flag: Is the detected country based on the IP address.
User Agent: This is a value showing player application and sometime which device your client is using. For instance, in the first row, we can determine that the client is using an Enigma 2 satellite box with OpenVIX image. You may expect names like “IPTV Smarters” or “Smart IPTV” show up here. However, sometimes some applications allow users to put fake names here.
Start: Is the time and date where this account started watching that channel.
Total: Is the total duration of being on the channel.
Type: Is the type of streaming feed. ts_live means it is a live tv being watched. mkv_movie for sure is a VOD content.
Owner: Is the panel username of the reseller, that is you.
VPN: Is where the CMS determines whether client is on VPN or not.
ISP: Shows your client’s ISP (Internet Service Provider) name.
Action: This allows different actions to be done to the client depending on which sort of action is allowed by the Admin of the IPTV Reseller Panel. Usually a Kick function is there which is good when your client connection is stuck on the server due to previous session being jammed, usually resulted after a sudden internet disconnection. You kick the session so user can reconnect again.
Connection Map:
Is the next section in left column in which you can see your connected clients on a world map.
Lines is the next section in left column:

Lines has 3 sub-sections:
-User: which basically refers to all the streaming lines – like M3U.
-MAG: all stalker portal MAC addressed are added here – this refers to MAG boxes and applications like STBEMU or Smart STB.
-XtreamTV: is an Enigma2 specific plugin which we discuss all about it later.
Let’s look into User section of the reseller panel

It’s very easy to understand and perfectly outlined. You can see from top left there is a search field to look up anything among the details which are going to appear in the table below once you create accounts. Next to it, on the same row, there are filtering functions, letting you filter data based on paid accounts, free trials, expired and so on. The gray Columns button on left side lets you add or hide columns in the table below. For instance, if you want to hide Owner column, you can hide it by clicking on Columns button and then deselect Owner.
Top side, There is an Orange button which is for filtering functions. Next to that, there is a Magnifier button which helps you magnify the data on the table below to make the reading easier. Auto Refresh, and if clicked changing to Manual Refresh, is related to the data of the table below, whether you want the data to get constantly refreshed every 10 seconds.
At the end of that row, Remove Expired Lines will delete all trial or paid expired lines in the table below – wont have any effect on MAGs or XtreamTV data.
Now let’s add a new paid account:
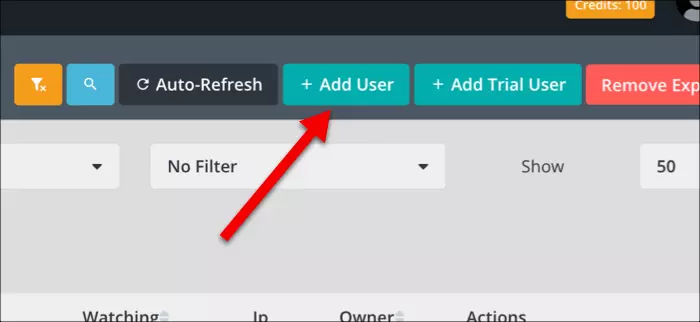
1-Click on +Add User

2-Leave Line Type as it is. Administrator of panels usually force Username and Password to be randomly generated by the CMS itself for security reasons so you may not be able to assign that. Next is ISP Lock which pairs the account to the first ISP the client uses to connect to the account and from that point forward, only that ISP is allowed to make connection to the account. If you trust your client, you can uncheck and disable this feature.

3-From previous step, I selected a 1Month package:
Max Allowed Connection: Is the number of concurrent devices allowed to use this account. 1 means only 1 device at a time can use this account but it can be installed on unlimited devices.
Expire Date: Is the expiration date calculated from today for a period of 1 month.
Price: Is the credit cost. This package costs 1 credits.
After finishing up with these details, there is a Bouquet Selection on the right side which gives you the option of trimming your client’s channel list.

4-This is basically the section where you decide which channels are shown on your client’s application. It can also be a tool to trim your client’s channel listing.
There are two columns, NOT IN which is used for excluding channels and IN to include channels on the account. Depending on your administrator desire and service structure, or even the requests from his resellers (You), the bouquet listing may look in many different forms. Our panel admin here has the following categories, countries. Full Package which includes all and everything and so on. As mentioned before, you can ask your IPTV Reseller Panel admin for your desired bouquet list and it can be created and added. Let’s give an example on how we can edit this section.
5-I first click on << button in the middle section to move all bouquets to the left side. Then if the client wants all channels, add “Full Package”.
You can write any desired Description in the box below this section for future references and then click SAVE.

6-Immediately after account creation, you should be redirected to the overview page. Everything looks clear but I’d like to focus a bit more on those Action buttons on the right side of the row.
![]() Stands for Extend. When you want to extend/renew an account, you should click this icon. Then you select a package for which you want to extend that account and click SAVE.
Stands for Extend. When you want to extend/renew an account, you should click this icon. Then you select a package for which you want to extend that account and click SAVE.
![]() Stands for Edit. You can click this and edit description of the account or the bouquet selection.
Stands for Edit. You can click this and edit description of the account or the bouquet selection.
![]() There are two of these. The one on the left is for Simple M3U which is a bare channel list and the one on the right for M3U_Plus which carries categories, Picons and EPG id. When you click these buttons, the related M3U url is copied into clipboard and you can paste it in the browser, your message to the client and …
There are two of these. The one on the left is for Simple M3U which is a bare channel list and the one on the right for M3U_Plus which carries categories, Picons and EPG id. When you click these buttons, the related M3U url is copied into clipboard and you can paste it in the browser, your message to the client and …
![]() Some applications need an EPG url and by clicking this button, the EPG url of the account is copied to clipboard and you can paste it anywhere you want.
Some applications need an EPG url and by clicking this button, the EPG url of the account is copied to clipboard and you can paste it anywhere you want.
![]() When you click this button, a full list of Streaming Line Extensions will appear. You can then click on the desired extension to have the URL or the command line copied to clipboard to paste anywhere you want.
When you click this button, a full list of Streaming Line Extensions will appear. You can then click on the desired extension to have the URL or the command line copied to clipboard to paste anywhere you want.
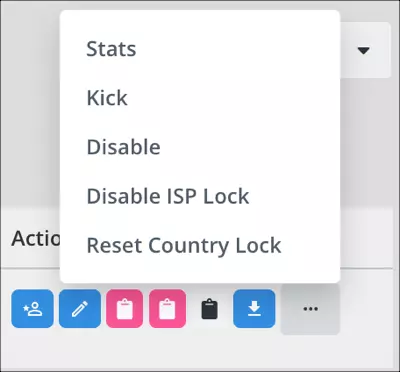
At the end of the row of those buttons, there is a 3 dot. When clicked, the following extra actions should appear.
Stats: Opens a new window and shows channels that your client has watched.
Kick: When you want to kick the client or end a live session.
Disable: Will suspend the account and client wont be able to use the account until enabled again. It is best to also run Kick after disabling the account to expire any valid sessions. This will ensure client can not login after the account is disabled.
Disable ISP Lock: ISP Lock function explained earlier. Here you can enable or disable it if you want.
Reset Country Lock: Just like ISP Lock, we have another lock called Country lock, same functionality but locks the account to a country. You can reset the lock if you want and if it is applied.
Now let’s move forward with MAG and see how we can add a MAG or any stalker portal MAC address to the IPTV Reseller Panel.

From left column on dashboard click MAG.
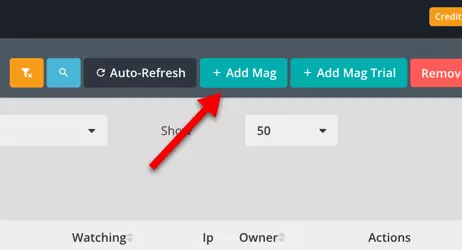
Top right click +Add MAG. As you can see, everything is exactly the same as what we did for Streaming Lines in previous steps. Even Adding a MAG for free trial is the same and you can see the button right there.
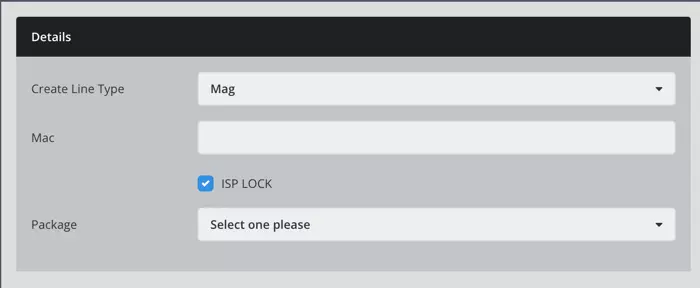
The MAC address you have received from your customer can be added in the MAC field above, then assigning a package is same as before we did for streaming lines. Finally when done click SAVE.

As you can see, MAC is added in MAG section. Once again, rest of the functions and controls on this page are the same as we reviewed with streaming lines.

The next section would be XtreamTV. This plugin was first made in 2018 by the same people who created NXT cms and later developed it a bit. But currently the developers of the CMS are so busy that updating this Enigma2 plugin is something which may never happen. On the other hand, there are other ways, methods and plugins to add IPTV to enigma2 devices which will later get linked here. So take my advice, and do not use this.
Let’s move on to the next section which is Subresellers, a section by which wise and active resellers can grow their income from the IPTV Reseller Panel!
Sub-resellers:
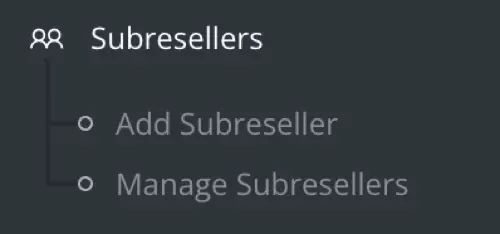
Clicking on Subresellers entry in left column will expand into two sub-choices:
Add Subreseller which takes you to the page where you add your new subreseller.
Manage Subresellers which is basically an overview page of the subresellers you created already, their activity and stats.
We start from Manage Subresellers page which will also cover Add Subreseller part.

Top right of the overview page, you should see two functions:
+Add Subreseller with Subreseller Creation: this means if you add your subreseller using this button, they can also add their own subresellers to the IPTV Reseller Panel, cool right? 🙂 most CMS panels have this option but point is, how active and smart can you be as the Master Reseller to have, not just single users, but also resellers with their own subresellers working under you?!
+Add Subreseller: You will add a subreseller but they wont be able to add their own subresellers.
Creation steps of both above are the same and by clicking on any button you will see the same page when creating the subreseller BUT the first one has a feature which the other does not.
Let’s go with the featured choice.
Creating a subreseller, with almost all providers, costs credits. With us it costs 50 credits but if the reseller is very active with us, they can ask for that 50 credits to be refunded to their panel, no worries. Some other providers are strict on this and do charge. We do as well but special treatment goes to very active resellers.
Fields above are very self-explanatory except for DNS.
DNS field can be your subreseller desired dns address. For instance if your subreseller wants to pair their own server address of their own preferred domain to their IPTV Reseller Panel, so their clients see their domain on streaming lines and stalker portal addresses, you can put the address here.
Once done, click SAVE.

Subrseller is created. In Type column, you see an orange sign saying Create which indicates that the subreseller has the ability to create subresellers as well.
There are some actions needing explanation:
![]() This one stands for Edit. If you want to change your subreseller’s username, password, email or even dns address, all can be done here.
This one stands for Edit. If you want to change your subreseller’s username, password, email or even dns address, all can be done here.
![]() When your subreseller asks for credit, once you have received payments from them, you can add the credit to their panel through here. A window pops up, you put the credit amount to be transferred from your panel to theirs, a description for future references if you want, then click Add.
When your subreseller asks for credit, once you have received payments from them, you can add the credit to their panel through here. A window pops up, you put the credit amount to be transferred from your panel to theirs, a description for future references if you want, then click Add.
![]() This will disable the reseller. It will suspend their access to their panel without affecting their accounts. You can unsuspend whenever you want.
This will disable the reseller. It will suspend their access to their panel without affecting their accounts. You can unsuspend whenever you want.
![]() This is the total suspension. It will suspend reseller access to the panel as well as all their created accounts. You can unsuspend whenever you want.
This is the total suspension. It will suspend reseller access to the panel as well as all their created accounts. You can unsuspend whenever you want.
Ok lets move to the next section.
Logs:

Next would be Logs, a place where you can see who does what. Click on it and let’s proceed.
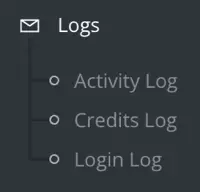
Logs are activity traces, reports of actions executed using services under your control. Looking into each section will clarify how easy and insightful it is.

This is the Activity Log. It shows all the actions done regarding account creations, service extensions, credit additions, suspensions and so on. The streaming line account we created has left a log, showing the exact action and outcome, how much credit we had on the panel (Shown in green) and how much we were left after the creation (Shown in red). It’s very clear, simple and a nice piece of information to have. Whenever you are in doubt of any action done on your panel, you can refer to this section to clear your doubt.

Credit log shows details on credits you have received from your server admin or given to your subresellers and even your subresellers to their subresellers.

And lastly, Login Logs, where you can see the time, date and the IP addresses of login attempts both yours and your subreseller and their subresellers.

